Coroutines 的第一件事|Scope, Job 與Context(1/4)
這是官方在 Android Developers blog 上發表關於 Coroutines 系列文,將深入解釋 Coroutines 關於 cancellation 與 exceptions 的處理 —— 適時的 取消任務 可以避免因為做太多需求外的工作而浪費記憶體或資源,而合適的 例外處理 則可以改善使用者體驗。
在接下來的系列文開始以前 ,本篇將會釐清幾個 coroutine 的重要概念,包含:CoroutineScope、Job 以及 CoroutineContext。

CoroutineScope
CoroutineScope 用以管理範圍內的 coroutine 行為,包括在該 scope 中呼叫 launch 或 async 所執行的 coroutine 任務。 scope 內現行的 coroutine 可以使用 scope.cancel() 來取消。
使用 CoroutineScope 的好處在於可以在特定 layer 內管理 coroutine 的生命週期,而 Android 也有官方的 KTX Library ,提供合適的 CoroutineScope給特定情況使用 ,例如 viewModelScope 和 lifecycleScope。
若你需要自行創建 CoroutineScope ,需要建構子 CoroutineContext :
Job
可以使用 Job 來管理 coroutine 的運行。任一透過 launch 或 async 創建的 coroutine 都會返回 Job instance ,用以識別單一 coroutine 並管理其生命週期。也可以選擇將 Job 傳入 CoroutineScope 來處理它的生命週期。
CoroutineContext
CoroutineContext 包含了定義 coroutine 行為的一系列元件。
Job- 管理 coroutine 的生命週期CoroutineDispatcher- 將任務分派給適合的 threadCoroutineName- 為 coroutine 命名(適合 debug 用途)CoroutineExceptionHandler- 處理過程中漏接的 exception,會在此系列文的第三篇提及
新建立的 coroutine 會有什麼樣的 CoroutineContext 呢?
我們知道新的 coroutine 會有新的 job instance,剩下的部分則會繼承自其 parent 的 CoroutineContext 。Coroutines 是有階層關係的,其 parent 可以是 CoroutineScope 或是另外一個 coroutine,端看新的 coroutine 是在什麼狀況下建立。
下面這段程式碼是示範如何在 coroutine 內創建更多的 coroutine 任務。
無論有多少 coroutines 階層,階層的根節點通常會是一個 CoroutineScope。Job Lifecycle
Job 有 New、Active、Completing、Completed 、Cancelling 以及 Cancelled 六個階段,但我們並不會直接使用這些階段,只會透過 isActive、isCancelled 以及 isCompleted 來得知 job 的狀態。
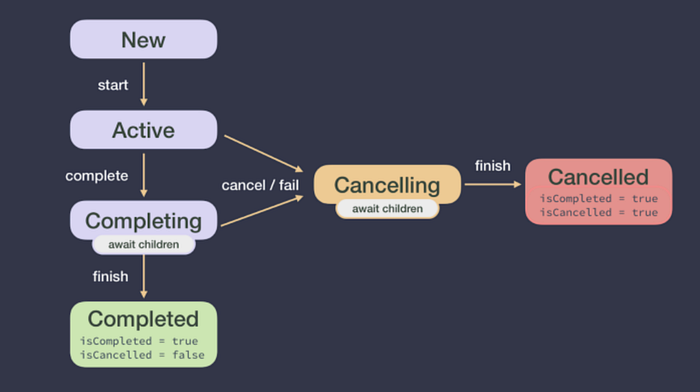
如果 coroutine 正處於 Active 階段,coroutine 執行錯誤或是呼叫 job.cancel() 都會將 job 移至 Cancelling 階段(isActive = false, isCancelled = true)。一旦所有子任務都完成後便會進入 Cancelled 狀態(isCompleted = true)。
關於 parent CoroutineContext …
因為有任務階層的關係,任一 coroutine 都會有一個 parent ,這個 parent 可以是 CoroutineScope 或是另一個 coroutine。但是 coroutine 最後的 parent CoroutineContext ,有可能會不同於其 parent 的 CoroutineContext。聽起來有點難懂,可以先看下面這個計算方式:
Parent context = Defaults + inherited
CoroutineContext+ arguments
- 有些元件會有預設值,例如
CoroutineDispatcher預設為 Dispatcher.Default ,CoroutineName預設為 coroutine 。 - Child coroutine 的 CoroutineContext 會繼承自 parent 的 CoroutineContext。
- 帶入 coroutine builder 的參數對於 child CoroutineContext 的影響會優先於上述預設行為。
📔 Note
CoroutineContext可以使用+來結合。因為CoroutineContext是一系列元件的總和,結合後的CoroutineContext會是右邊的被左邊複寫,例如:
(Dispatchers.Main, “name”) + Dispatchers.IO = (Dispatchers.IO, “name”)
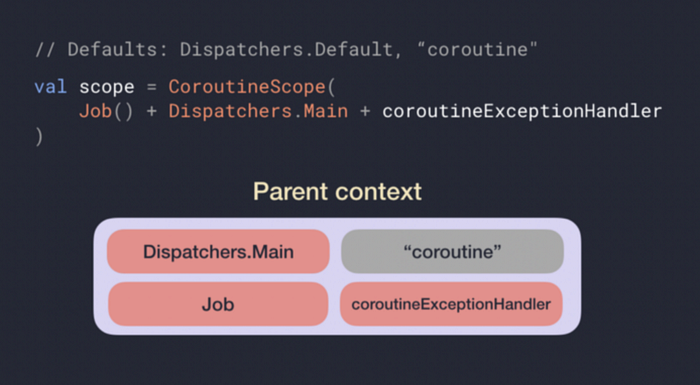
在 CoroutineScope 內執行的 coroutine 都至少會有以上四種要素,灰色部分是因為這邊宣告的 scope 未指定 CoroutineName ,使用了預設值。
現在我們知道新建立 coroutine 的 parent CoroutineContext 是什麼了,那麼實際上 coroutine 的 CoroutineContext 會是:
New coroutine context = parent
CoroutineContext+Job()
假如我們在上圖這個 CoroutineScope 之中再建立新的 coroutine:
val job = scope.launch(Dispatchers.IO) {
	// new coroutine
}
階層關係就會變成下圖這樣:
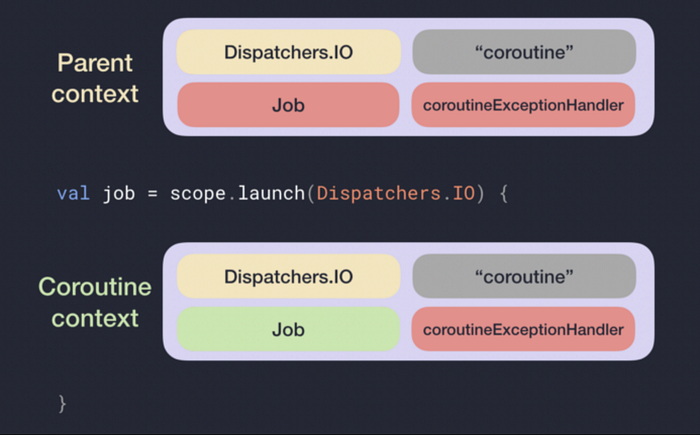
- Parent context 與 Coroutine context 的 Job 並不相同,因為每個 coroutine 都會個別返回一個新的 Job instance。
- 最後的 parent
CoroutineContext會改為 Dispatcher.IO 而非前一張圖的 Dispatcher.Main,是因為從 coroutine builder 帶入的參數會複寫原本的設定。 - 此外,這邊也會產生兩個不同的 Job instance。
此系列文的 Part 3 將會介紹 CoroutineScope 中, Job 的另一種實作方法:SupervisorJob。SupervisorJob 可以特別針對 CoroutineScope 內的 exception 進行例外處理。因此 scope 內產生新的 coroutine 任務可以使用 SupervisorJob 作為 parent job,但要是 parent 是另一個 coroutine 的情況,parent job 就只會是 Job 了。
現在你已具備 coroutines 的基礎知識,可以透過接下來的系列文瞭解如何處理 coroutines cancellation(Part. 2) 與 exceptions (Part. 3),以及一些實務運用上的建議(Part. 4)。